Thursday 26 May 2011

Tuesday 24th May


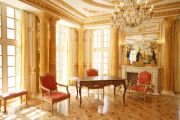
Today was the last day before the photoshoot. Every one had little jobs that needed to be complete myself, Jenny and Ryhan polished all the metal and bronze knick-knacks using a combination of metal polish and wire wool, depending on which worked the best. The curtains made by Lauren were hung in the Drawing room and Study. Mirrors, pictures, skull heads and lights were hung/ attached to the walls in the right places.


As candles were being displayed in the Drawing Room and Study which needed to look like they had been used, myself and Jenny melted wax a dripped it over the top of the candle to look like it had been lit for a while, we did this with all the candles. To get the candles to stand in the candelabras we had to melt a small amout of wax into the bottom and place the candle in before the wax hardened. We also burnt some of the candles to make them look smaller than others.


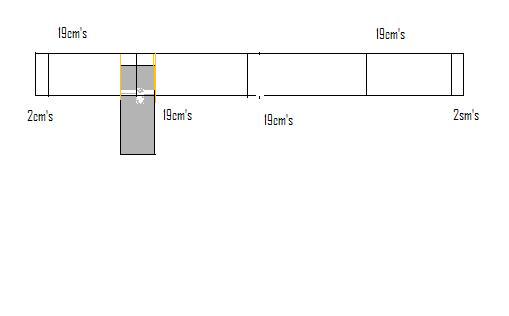
The next job was to lay the flooring. Myself,Rhyan and Steph did this with help from Simon. Callum had already varnished some of the flooring so it was a case of laying it. Under the panneling was gap big enough to fit a plywood underneath, in some places this was not the case, so the wall had to be slightly lifted by a crow bar and then put back done once plywood had been slipped underneath. 2 pieces of plywood fitted the width of the room, although a small amount needed to be cut off to get a perfect fit. The plywood also needed to be cut so it fitted around the doors.


More plywood was needed than had been stained, unfortunatley there was not enough stain to cover the remaining boards. Myself and Rhyan went to Wickes to get more, while other members of the group continued with hanging pictures. Rhyan,Sarah, myself and Steph stained the last remaining boards and left them to dry over night.


Before we left we fire retarded all the furniture and curtains.


This was our last day before filming/ photographs being taken.


Although there wasnt much left to do, they all nedd to be done probably and thought about carefully this being the time consuming part.


First of all we started by hanging the curtains, we did this by stapling the top of the curtans to the top of the windows. We still needed to give the illusion that the walls/windows are taller than they actually are, so we had to hang the curtains in specific way to achieve this. By having a curve in the curtain and not having the curtain over the whole window, we managed to achieve this.

Monday 23st May 2011

Today myself and Jenny finished the other 2 windows ( Drawing Room and Study) using the same process as Friday 19th May.


Once we had completed all the windows, some area of the cross bars needed filling as some of the slots were cut to big. We did this using carbody filler, to smooth over we used anything with a smooth edge, we unfortunately could find any card, so we used what we could find which was an expired railway card.


While this was drying we decided that wood stain would be the best option for covering the windows, as the doors and floors had already been stained with this. As there wasnt much stain left myslef and Jenny went to Wickes to buy some. Dark oak satin wood stain was used.


We applid 2 coats of stain to the windows (leaving to dry inbetween) using vasious size brushed to stain smaller or larger areas. We left these to dry over night as they were still tacky by the time people wanted to hang the curtains.


I think overall the windows turned out really well, we had our difficulties making them along the way but the end result suited the room well.


I would have like to have made the whole of my original design with the arche ontop of the window but as the tops were not being shown and it would have wasted time and would have ruined the illusion of the extra height.


Friday 20th May 2011

As previous research had shown, cross bars were used for the center/ decoration of the windows creating a squared or rectangular shape. Primarily being in wood and sometimes being an iron like material.


Going from my autocad design, we needed to find a material that would be small, but strong and thick enough to be used to create the cross bars in the center of the windows. We discussed using plywood, hardwood, mdf, softwood or going to Wickes to find something. We decided on using the softwood we used for the frames but cut into long thin strips.
First we cut the strips of wood to the length and width of the window adding 2cm's to each end, this was so that the stripes could be attached to the window frames with out seeing any screws. We then measured and divided the window frame into sections of where the cross bars would go.


So that the cross bars would fit together we marked the smaller bar (horizontal cross bar)at 19cm intervals. As shown on the diagram:

To get the correct width to be cut out we used another piece of the same wood to mark out the width.


We marked this peice of wood with a center line and matched it up with the 19cm mark, we then drew either side of this piece of wood. These were the lines we would cut down.
The diagram on the right shows how the wood was cut out ( small horizontal cross bar) to cut this out we had to make were the the center mark of the width of the wood, we did this by using a measuring gage, we did this at every mark needing to be cut. We the cut down the line marked previously untill we got to the line marked by the measuring gage. We used the band saw to cut this down, cutting down the lines that were marked out first and then cuting down to the line marked by the measureing gage until a small square shape was cut out.


As shown in diagram >>>


This process was repeated for the longer vertical cross bars, with a slight difference shown in the diagram below:

The 2cm's either sided needed the be cut the same side of the wood as the rest of the cuts. So when made the bars will fit together correctly.


The next stage was to attach the bar to the window frame. We did this by marking the bottom part of the frame at 19.5cm intervals to get the correct distance between the bars. The first bar to be hammered in was the center vertical bar.


The 2cm over hang was placed like the diagram shows, so that the front was flush. This was hammered in with a pin. We repeated this for the top and the other 2 verticals bars.


For the Horizontal bars, they fitted into the gaps previously cut and were pinned to the vertical frame.


Before we left for the day we cut out the rest of the wood ready to continue with the other 2 windows on Monday.


Wedneday 25th May 2011

Today was the day of the photoshoot. Everyone came into uni really early to get the final touches just right. Rhyan bought in the rugs from her dads house which we used in the Study and Drawing Room. Once the rugs were in place we were able to place the furniture in its final position. All the knick-knacks were placed on the cabinets, as we did not have enough to cover as much of the surfaces as we would have liked we borrowed some from group one. Fiona bought in a mirror to be hung and also real and fake flowers to be cut, put in vase's and placed around the Drawing Room.


To cut out the harsh lighting from outside and the view out the windows of the scenic room, we covered the backs of the windows with black material. The roof of the Study was also covered in this material.


The floor then needed a good sweep and there were plenty of dusty foot, unfortunately we could not get all of these off.


When the photographers arrived we were told about the equipment they had bought with them, how to set it up and health and safety. We discussed what we thought the lighting should look like in each room, we decided that the study should be dully lite, with a blue/white light to create the feeling of coldness. For the drawing room we decided that this should be in contrast to the study, being light and the feeling of warmth using orangey lighting.


We dicussed what would be the best way to light the rooms and we decided on through the windows as this would create the right shadows for natural light. We made the Drawing Room lighting as light as we could. As well as using 650watt lighting through each window we also used a duller light over the door and on the ceiling above the table.


For the study we lit the room in the same way with just a 650watt light through the study window, as the light on its own was too bright, we used different materials to cover and bounce the light. This was a very timely process. an extra light was added next to the cabinent to create more shadow and contrast.


The most important thing we learnt today was what looks perfectly lite to the eye will look completely different through a camera lense, so always look trough the camera while deciding on the right lighting.


I really enjoyed this project, the work that everyone has put in and the quality of the end result is amazing. Im really proud of the end result and would love to do a project like this again.


some pictures from the day:


Wednesday 25 May 2011

Thursday 19th May 2011

Myself and Jenny started to measure up for the windows and cut out the wood ready for building.

We began by measuring the gap for the windows using a tape measure ( 3foot by 5 foot)We took these measurements and marked them out on pieces of softwood.

We then cut the pieces of wood out using a mitre saw wearing correct PPE ( overalls, stealcapped boots and long hair tied back) Once all the wood was cut out we started on the window near the doors. First we made sure that the pieces of wood fitted we then placed one of the 5foot pieces of wood in place and screwed to the flats.
As shown by the diagram to the right. The piece of softwood was placed in the gap made previosly for the windows. To get the correct placing of the wood frame 1 piece of wood was placed so it was flush with the front of the window (Drawing Room side) another piece of wood was placed behind this and screwed into place. 2 screws were used in each of the 3 sections of the frame.


By using this first piece of wood flush with the frame of the gap we were able to mark were the center was, as a window frame would not sit flush with the interior or exterior of a building.


We repeated this for the other side.


To fix the frame acros the bottom and top we needed seperate blocks of wood screwed into the vertical softwood frame and the bottom frame being attached now. ( as shown by the diagram)

First we cut the blocks of wood and drilled 2 pilot holes, we did this to ensure that the wood wouldnt split when screwing together. While Jenny held the blocks I screwed them into place using a power drill. We repeated this for the top. We had to take the top brace off so we could screw the blocks on safely and securely.


As this was a timely process Abbie and Nikki M started on the second window in the drawing room screwing the vertical pieces of softwood in place. They had a few problems with getting the screws at the top into the wood.
Once Jenny and I had finished the first window frame we went to attach the bottom and top pieces of wood on the window Abbie and Nikki M had started. Unlike the first window, the gap was too big for the pieces of wood we had cut. After measuring we became to realise that not all the gaps for the windows were the same width.
We re-measured and cut more wood to fit the gap. While we were doing this Abbie and Nikki M started the vertical frames in the study.

We then repeated the process for the top and bottom frames on all three windows.

If I was to do this again I would not rely on agreed measurements for the windows or just the measurements of one window, I would measure them all before starting.


While myself and Jenny began on the windows Ryhan began to Brade the loveseat, using gold brading and a hot glue gun.


The cushion we used were previosly made by Abbie.

Wednesday 18th May 2011

We hit a bit of a problem when finishing the upholstering of the loveseat. 3m's of fabric was needed in order to finished, but we only had 2.4m's. Luckly the fabric was longer than the sofa, so it was possible for us to cut the bottom off and use that as the extra fabric we needed.


We decided that the best way to do this would be to have 4 pannels on the back of the seat, using the cut off at the bottom as the back panels. We cut this 2foot piece of fabric in half and lined the first one with one side of the hardboard marking the center of the back of the sofa. We stappled this at the top just under the plastic tubing first. Then we stappled down one side, hemming a small part of the fabric and stappling in place. We then repeated this on the other half of the material.


Once these were done we attached the 2 side panels. We did this by first attaching fabric to the from of the arm and wrapping round untill it meets one of the back panels. this piece of fabric was also stappled just under the plastic tubing and hemmed to create a neat seam.


To finish we pulled all the excess material under the loveseat and stappled to the hardwood. For the legs we had to cut some of the material in order to get a neater finish, and stappled in place.

Tuesday 17th May 2011

Today we strated to upholster the love. Ryhan had already made the frame/base.


While jenny completed the last few bits of stenciling Ryhan and myself started to cut the foam I had got over the holidays to fit the love seat.

We tried to get one large piece of foam to fit the love seat but unfortunalty didnt fit probably. So we decided to cut the piece's of foam to fit inbetween the four upright sections to the back of the seat. To secure the foam to the back of the love seat we folded the foam round the plastic piping and stappled in place. Trimming and over hang.


When all th tops of the foam had been stappled we decided that the back of the love seat wasnt 'full' enough. We debated what we could use to pad out the back, we tried pulling the foam out abit so it would it has a slant but this did not give enough support to the back when sitting on it. So we decided to stuff the back underneath the foam with small pieces of polystrene and scrapes of foam.


While myself and Jenny cut foam and stuffed the back Ryhan cut the stappled foam so it sat on the seat evenly. Once the back was stuffed we could staple the foam to the seat.


The seat for the love seat was too low even with the foam stappled to it, so we decided that another piece of foam should be added to the seat as a cushion. To do this we placed a cut down piece of foam ontop of the seat and drew the shape with a perminant marker. We then cut out the shape using a stanley knife, making sure it fitted to the seat.


To upholster the chair we started by cutting 3m's off the pink fabric, Nikki T had found in her mothers shop, costing £3 a metre.

With the 3m's that we cut off we drapped it over the inside of the loveseat and stappling to the seat. We stappled to foam to the shape of the chair that we had created with foam previously. We then pulled the fabric so it was tight, wrapped it round the top of the love seat and stapled it to plastic tubing. This proved difficult as if not enough pressure was applyed the staple would only secure to foam and would fall out. We stappled this all the way the top of the love seat.

At the arms of the chairs we were a little stuck on how to attach the fabric with out it looking badly done, so we tried a few things out and decided on a pleat.


Once we had done this to both arms, we realised that we did have any foam or fabric at the front of the chair, as this was not being cover by the seat cushion we stappled a small piece of foam and cover in fabric, attaching it underneath the seat and ontop under where the cushion will be.


We then went round and trimmed all the uneven edges to give a neater finish. As we were running out of time that day and were unable to get to a sewing machine, Jenny took the seat cushion and 1m of fabric home ( as she has a sewing machine at home) and made the cushion seat ready for wednesday morning.