 As previous research had shown, cross bars were used for the center/ decoration of the windows creating a squared or rectangular shape. Primarily being in wood and sometimes being an iron like material.
Going from my autocad design, we needed to find a material that would be small, but strong and thick enough to be used to create the cross bars in the center of the windows. We discussed using plywood, hardwood, mdf, softwood or going to Wickes to find something. We decided on using the softwood we used for the frames but cut into long thin strips.
 First we cut the strips of wood to the length and width of the window adding 2cm's to each end, this was so that the stripes could be attached to the window frames with out seeing any screws. We then measured and divided the window frame into sections of where the cross bars would go.
 So that the cross bars would fit together we marked the smaller bar (horizontal cross bar)at 19cm intervals. As shown on the diagram:

To get the correct width to be cut out we used another piece of the same wood to mark out the width.

To get the correct width to be cut out we used another piece of the same wood to mark out the width.
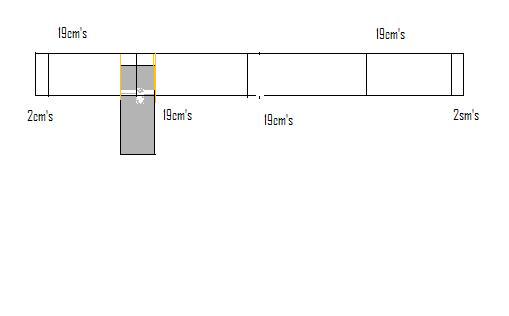
We marked this peice of wood with a center line and matched it up with the 19cm mark, we then drew either side of this piece of wood. These were the lines we would cut down.
 The diagram on the right shows how the wood was cut out ( small horizontal cross bar) to cut this out we had to make were the the center mark of the width of the wood, we did this by using a measuring gage, we did this at every mark needing to be cut. We the cut down the line marked previously untill we got to the line marked by the measuring gage. We used the band saw to cut this down, cutting down the lines that were marked out first and then cuting down to the line marked by the measureing gage until a small square shape was cut out.
As shown in diagram >>>
This process was repeated for the longer vertical cross bars, with a slight difference shown in the diagram below:

The 2cm's either sided needed the be cut the same side of the wood as the rest of the cuts. So when made the bars will fit together correctly.
The next stage was to attach the bar to the window frame. We did this by marking the bottom part of the frame at 19.5cm intervals to get the correct distance between the bars. The first bar to be hammered in was the center vertical bar. 

The 2cm over hang was placed like the diagram shows, so that the front was flush. This was hammered in with a pin. We repeated this for the top and the other 2 verticals bars.
For the Horizontal bars, they fitted into the gaps previously cut and were pinned to the vertical frame.


Before we left for the day we cut out the rest of the wood ready to continue with the other 2 windows on Monday.


Before we left for the day we cut out the rest of the wood ready to continue with the other 2 windows on Monday.
No comments:
Post a Comment